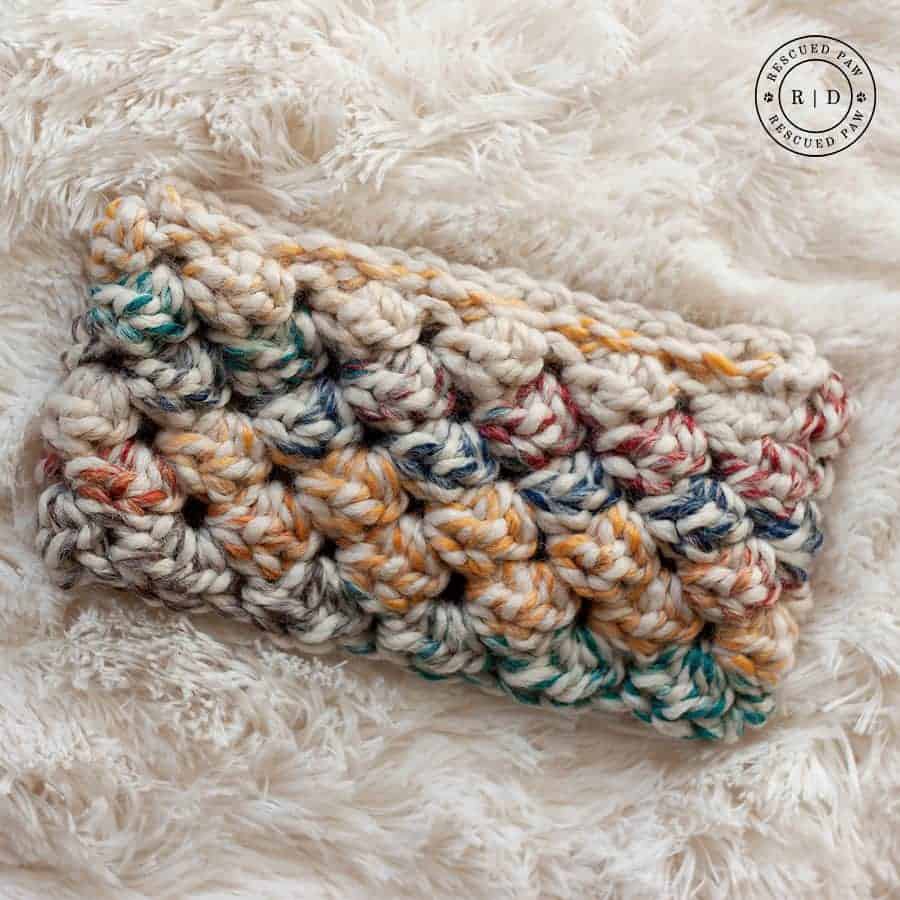
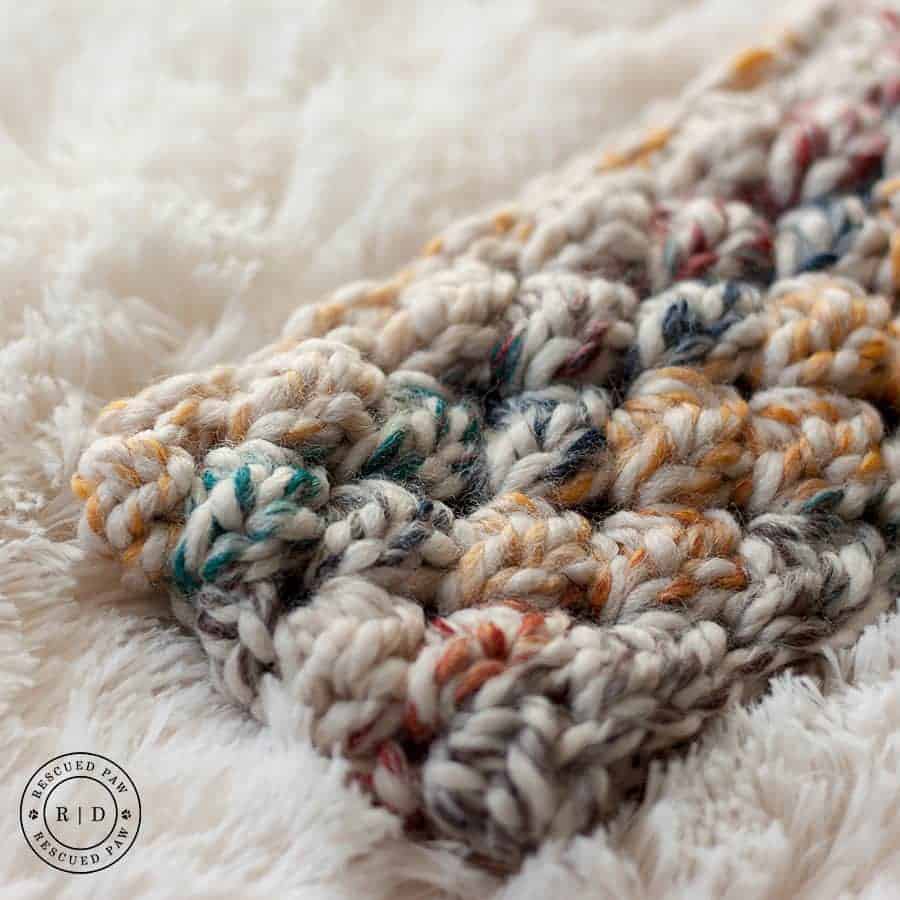
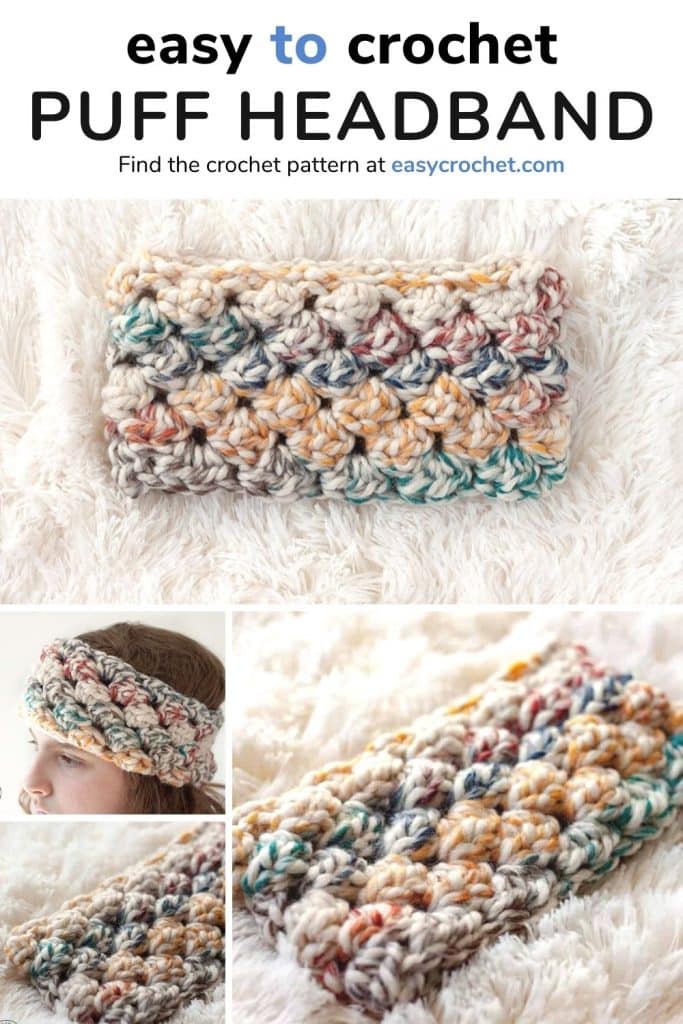
Free Puff Crochet Headband Pattern
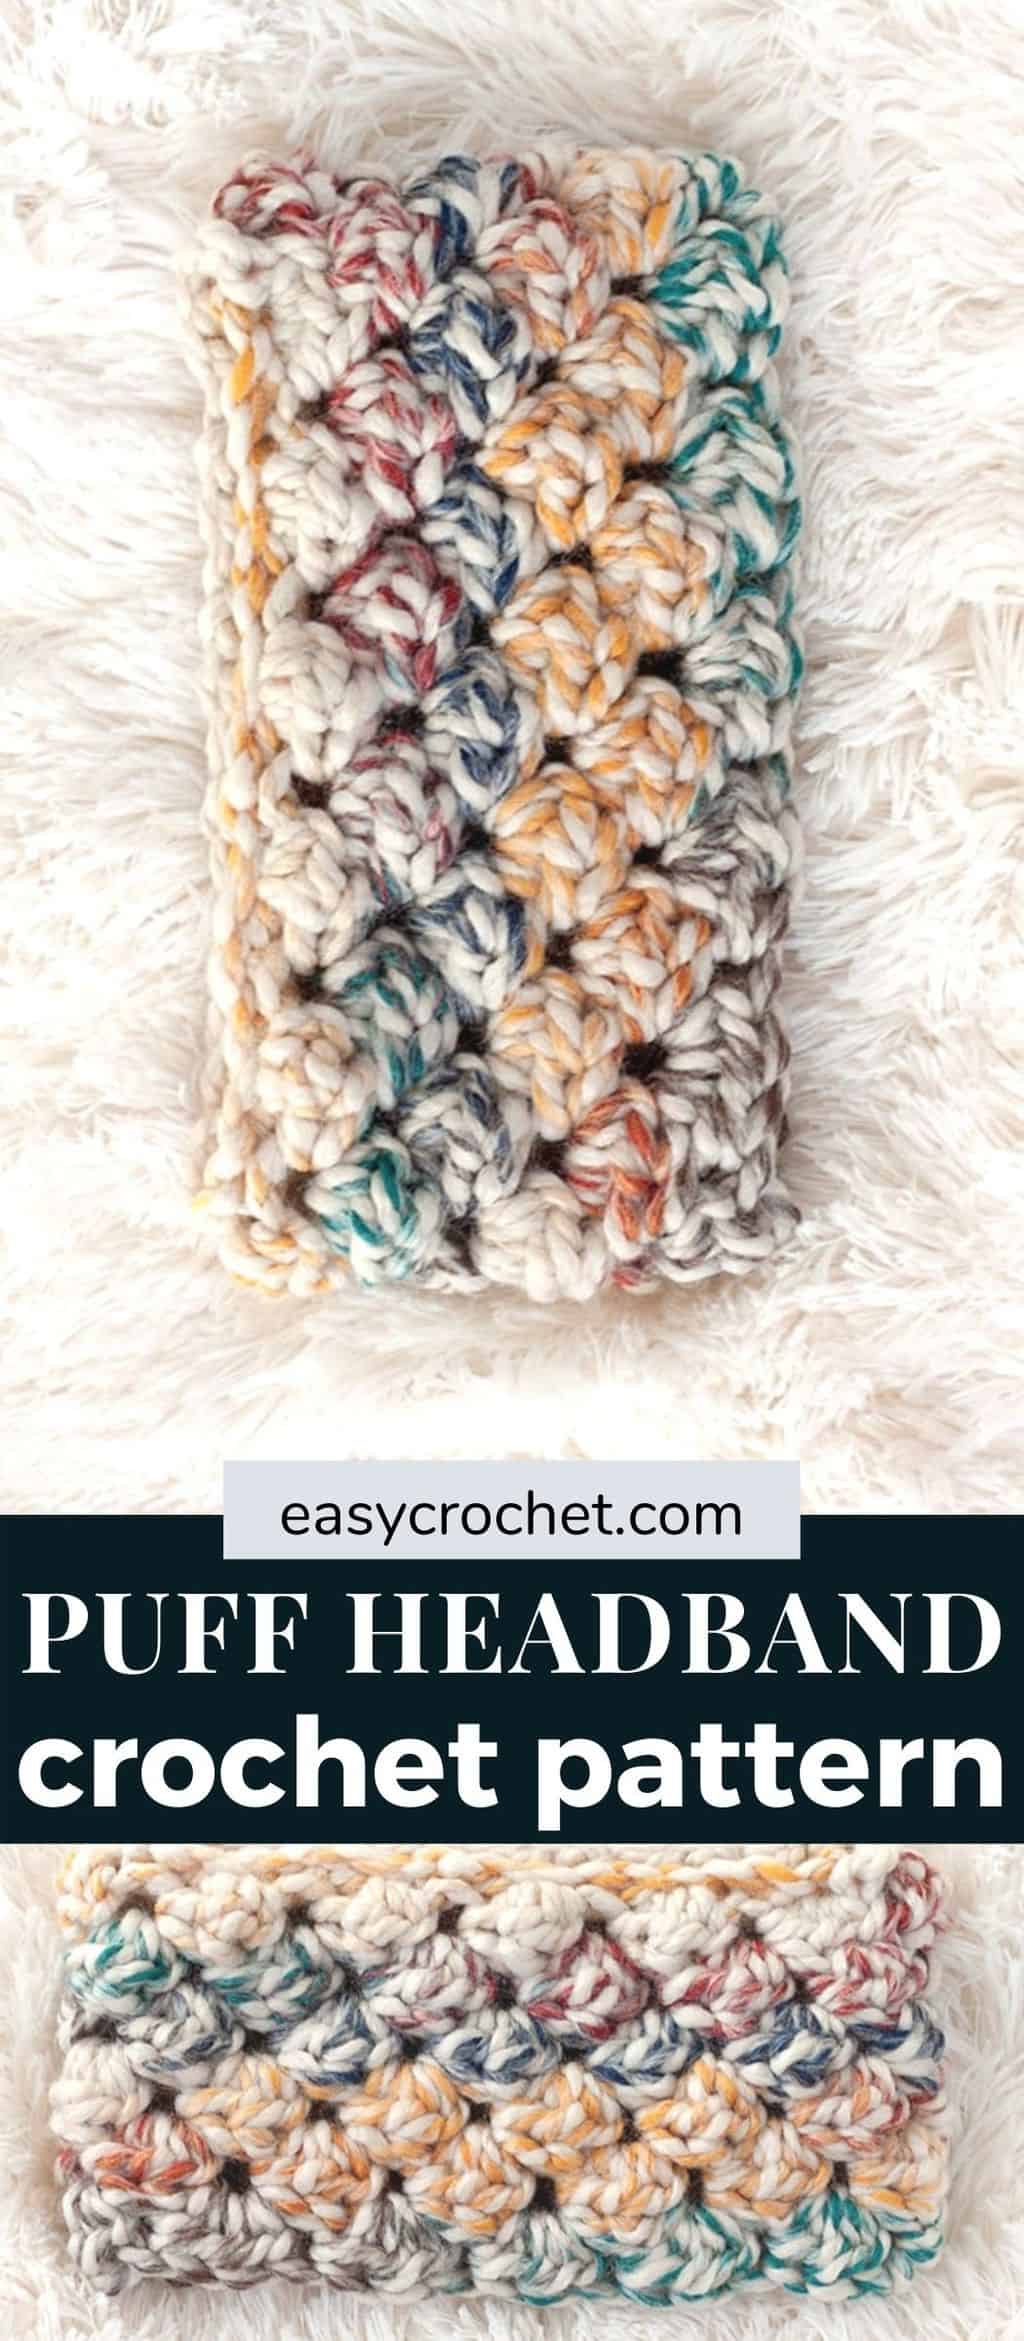
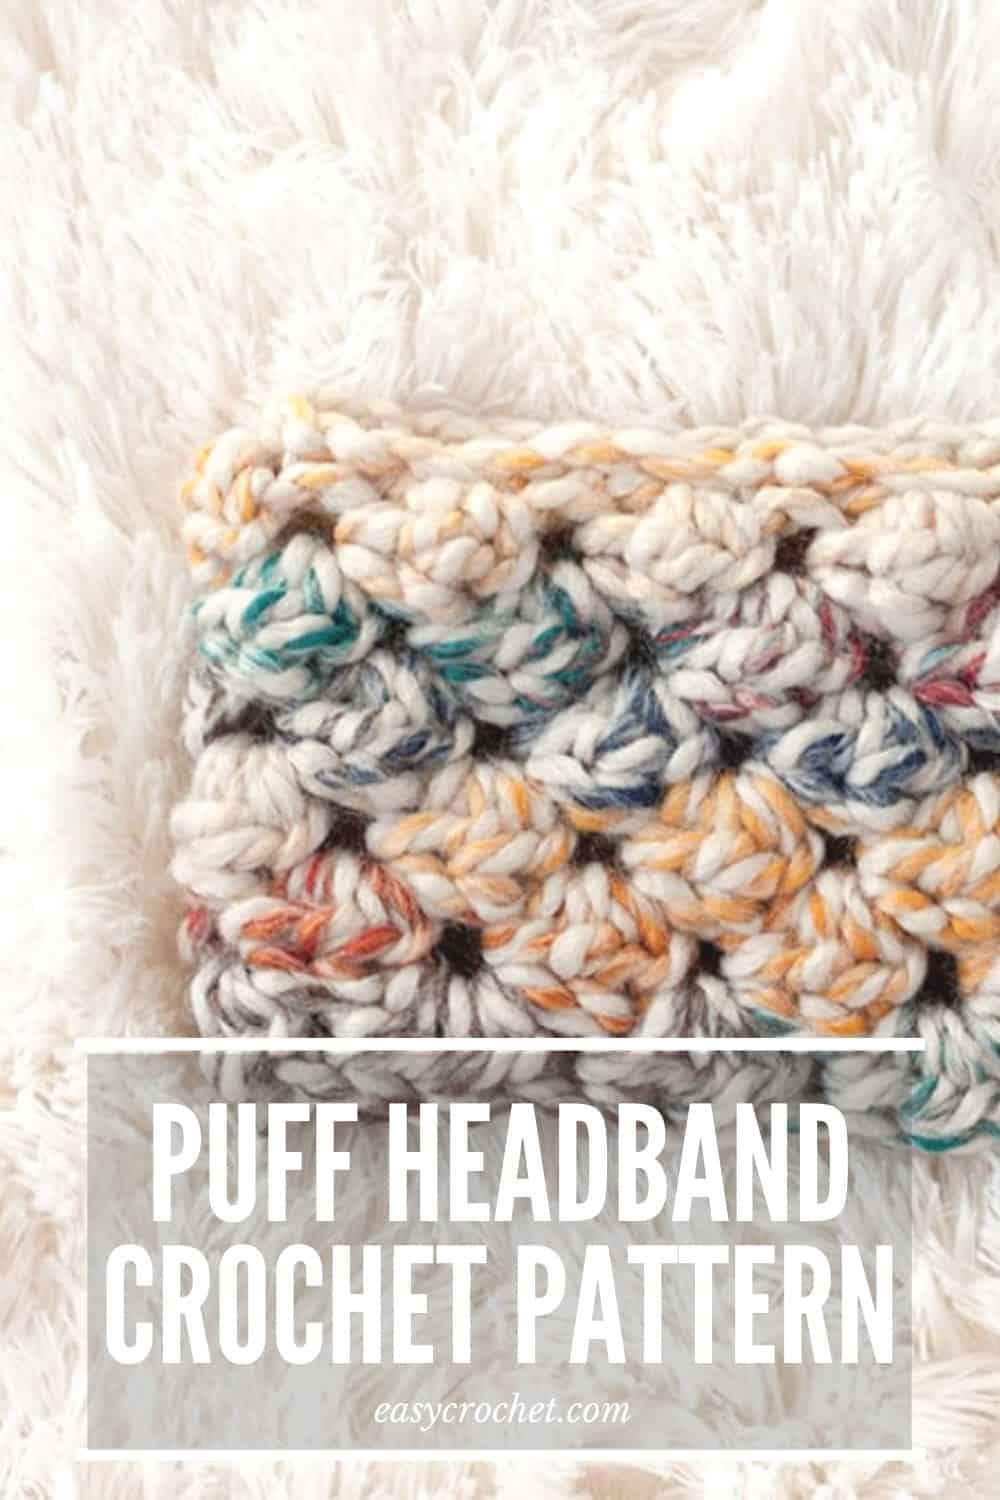
This easy pattern, the puff stitch crochet headband, is simple to crochet and can be worked up in no time at all!
If you are looking for a quick go-to project that is easy to make, then this free crochet ear warmer pattern is for you.
Ready to crochet it now? Keep on scrolling down to learn how to crochet an ear warmer for a child with my free crochet pattern!

Happy Crocheting!
The Perfect Yarn for This Head Band
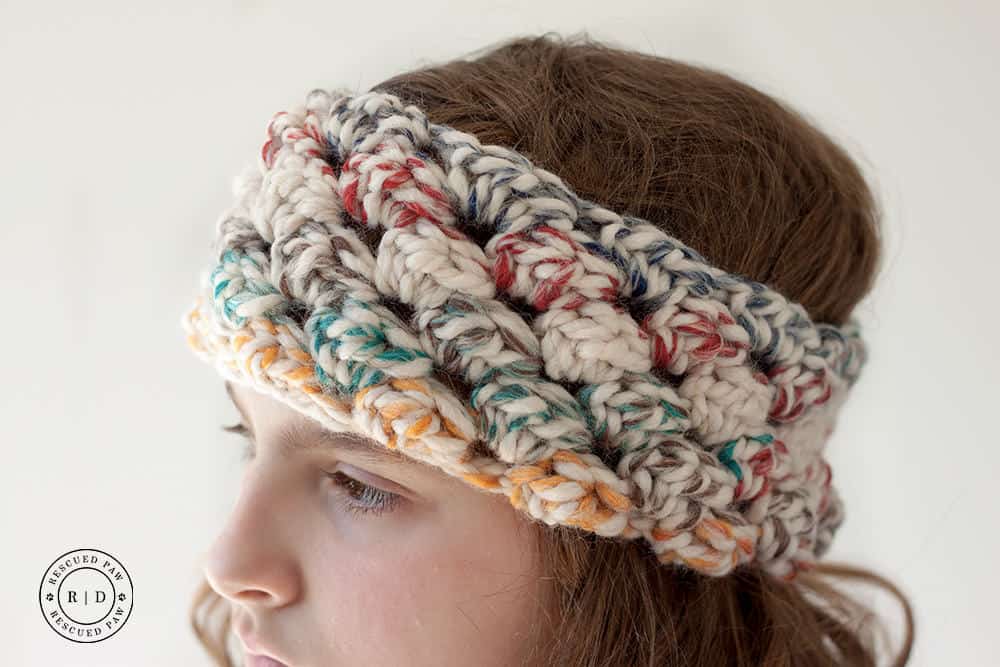
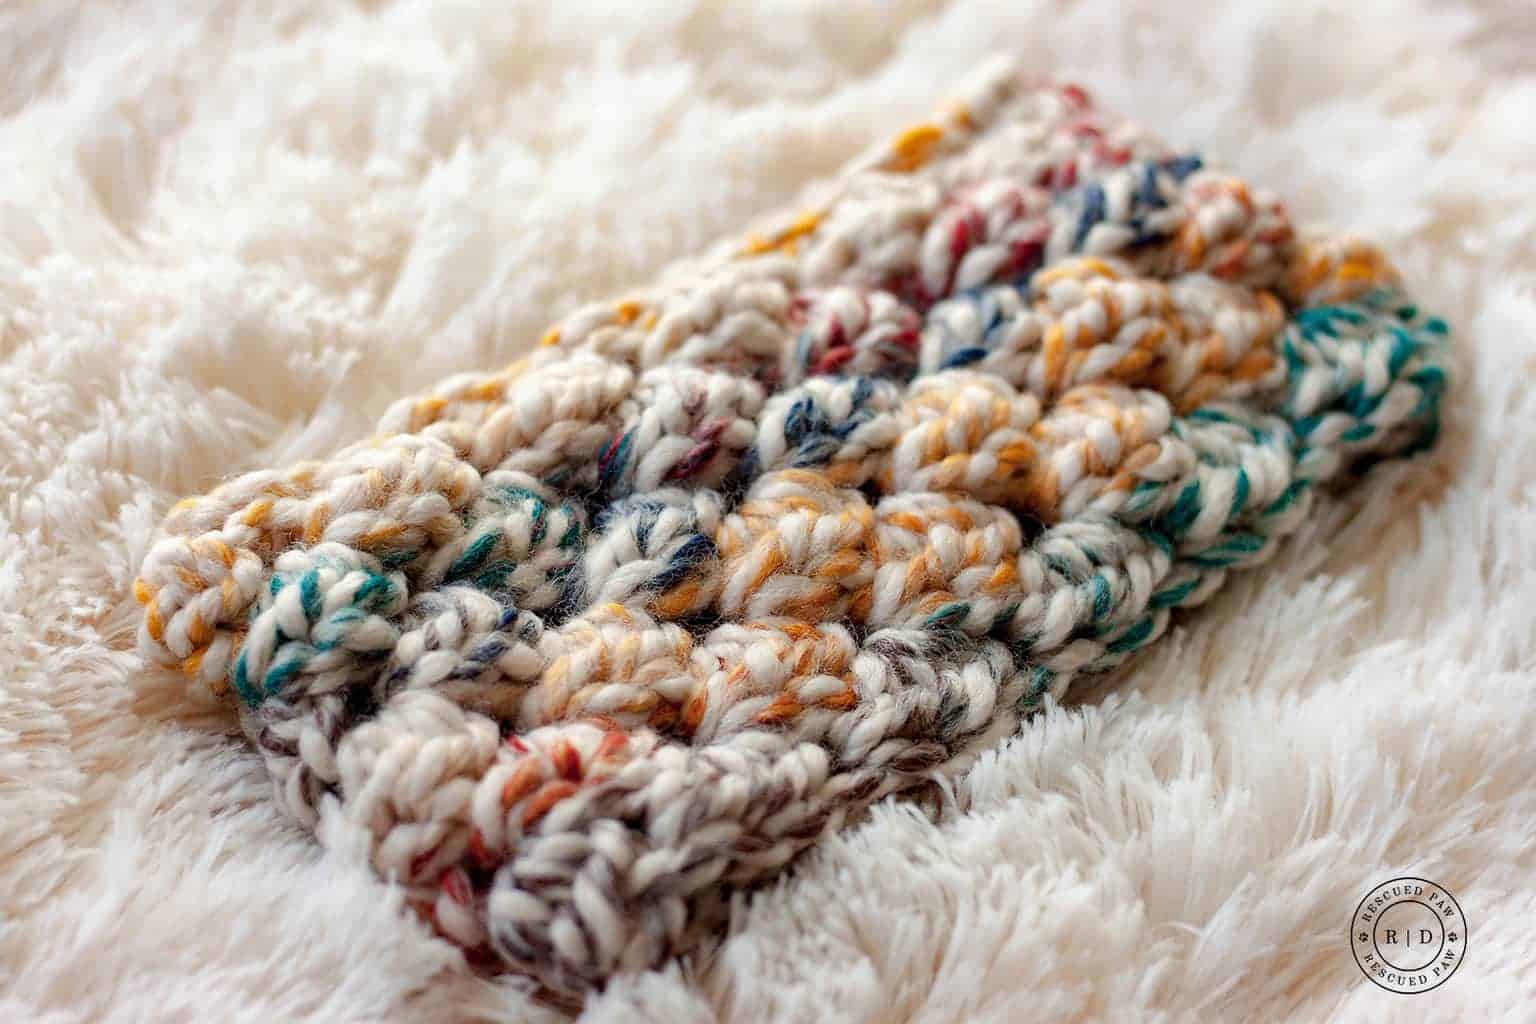
I used Wool-Ease Thick & Quick from Lion Brand Yarn in the colorway Hudson bay, and this honestly is one of the most beautiful colors I have ever worked with in this line!
Thick & Quick is an 80% acrylic and 20% wool blend yarn that is easy to work with.
If you haven’t tried this one yet, then you most definitely should since it has a variety of yarn colors sure to please anyone!
(Click on the yarn image to explore the different color options!)

You’ll love how chunky this yarn is because yarn that is bulky means a project that crochets up fast. Another bonus is that it is available in quite a few different colors, all of which are beautiful!
Need a substitute yarn? You can use Thick & Quick, which is similar to Wool-Ease Thick & Quick, but doesn’t have any wool.
The Stitches
It is a great crochet headband for beginners who’d like to try a pattern that is a little more than just one stitch!
Just half double crochets and single crochet stitches are used. That’s it for the entire headband pattern. If you can crochet those two basic stitches, then you’ll be set to make this headband!
If you’d like a refresher on the single and half double crochet, be sure to check out my blog posts about these simple stitches. Or take a look at the stitch explanations of them below.
Single Crochet (sc):
- Insert hook from front to back in the second chain from the hook or designated stitch
- Bring the yarn over (Yo) the hook and pull the yarn back through the chain (or stitch) from back to front (2 loops on hook).
- Yo and pull through both loops on the hook.
Half Double Crochet (hdc):
- Yo (yarn over) insert hook from front to back of the designated stitch, yo the hook and pick up a loop.
- Yo the hook and pull back through all three loops on the hook.
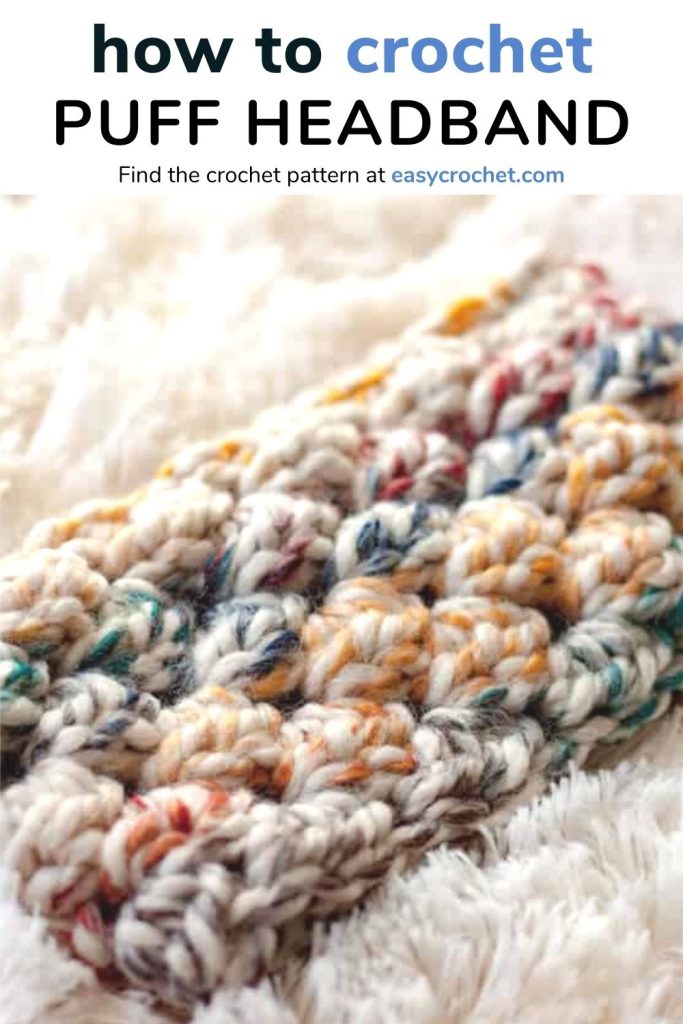
This puffed crochet headband pattern is designed in almost the same stitch sequence as The Charlotte Blanket, except for this headband we will be using half double crochet’s and be working in the round.
If you are a beginner, you can work this pattern fast and have a cozy and warm headband to show off to all your friends. This beginner crochet headband pattern is easy to crochet! Promise.
Quick to Crochet
If you have 20 minutes, then you can make this headband pattern! The chunky yarn along with the easy stitches makes for a fairly quick crochet headband.
With how little time, it takes, you could make quite a few of these headbands in a day or a weekend!
If you’re ready to make an easy puffed headband, then grab your crochet hook, yarn and let’s get started! Scroll on down to find the full, free, and easy crochet pattern!
If you have any questions, please feel free to ask as long as they are kind and respectful. I spend countless hours photographing, charting, and designing patterns because it is what brings me joy, and hopefully, it does the same for you too.
I am human, so sometimes mistakes are made. If you find any in my design, please let me know as long as it is with kindness. Thank you in advance.
Puffed Crochet Headband Pattern
Skill Level: Easy
Materials
- Crochet hook 9 mm
- Less than a skein of Lion Brand Wool-Ease Thick & Quick in Hudson Bay or any super bulky 6 yarns.
- Large yarn needle
- Scissors
- Measuring tape

Crochet Abbreviations
- ch = chain
- sk = skip
- st = stitch
- hdc = half double crochet
- sc = single crochet
Gauge
- Each sc, hdc, hdc cluster is approximately 1.5″
- Gauge must be followed for proper fit
Finished Size
- When following gauge as written, the finished size is approx. 19″ circumference (unstretched / unworn) and 4″ tall which is perfect for a child.
- See below on how to make this headband bigger or smaller
- To make this headband larger or smaller use a starting CH in a multiple of 3 (ex 3,6,9,12,15, 18,21,24,27, 30,33,36,39, 42,45,48, etc.) and then follow the pattern as written decreasing or increasing rows as needed.
- Take a look at our headband and hat sizing chart for extra help on the correct sizing for teens, adults and more.
Notes
- I turned my headband inside out (as shown in pictures) because I liked the way the stitch definition looked, but either way would look good. If you’d like it to look exactly like the picture, turn your headband inside out when you are done.
- Written in standard US terms
- The skipped stitches/ch 1 do not count as stitches
SELLING: You may sell items made from patterns on EasyCrochet unless otherwise stated. If you choose to sell items made from this pattern, please link back to me at www.easycrochet.com for credit. Please do not use my pictures to sell your items.
IMAGES & CONTENT: The images and content of EasyCrochet.com are protected by copyright laws. Do not distribute or copy the content without written permission. Do not edit or remove watermarks from any original image. Thank you for respecting my work.
TRANSLATIONS: Please do not post a translation of my pattern(s) anywhere. For further questions, please email krista@easycrochet.com.
Headband Pattern Steps
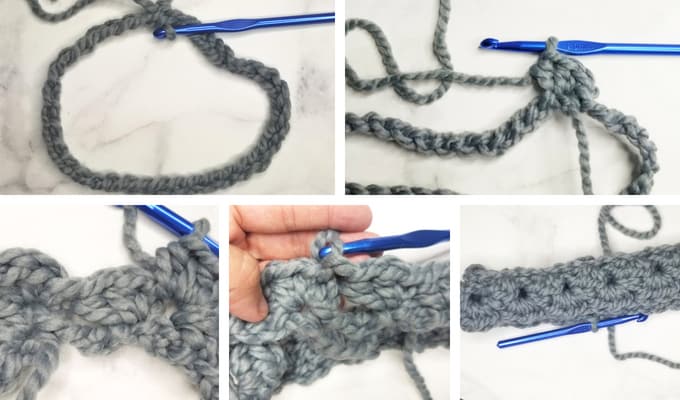
TO START: ch 36, join with a sl st into the first ch to form a circle, making sure not to twist. (36)
ROUND 1: ch 1, in second ch from the hook (sc, 2 hdc’s) *sk next 2 ch’s, sc, hdc, hdc in the next st, repeat from * around ending with 2 sk chs, join with a sl st to top of the first sc in the round. (36)
ROUND 2: Ch 1, in the first st (sc, 2 hdcs), *sk next 2 sts, in next st, make a sc, hdc, hdc, repeat from * around ending with 2 sk sts, join with a sl st to top of the first sc of the round. (36)
ROUND 3 – 6: Repeat round 2 to finish the pattern.
FINISHING: Fasten off ends with scissors and weave all yarn ends into the headband securely with a yarn needle. Picture is shown with starting ch on the top but you can wear yours either way!

You May Also Like These Crochet Headband Patterns Too
- 15 Free Crochet Bandana Patterns for all Skill Levels
- 14 Free Crochet Beret Patterns
- Neon Rainbow Striped Crochet Hat
- 7 Easy-to-Follow Slouchy Hat Crochet Patterns You’ll Love
- Chunky Crochet Ear Warmer Pattern
- Bernat Yarn Scrunchie Crochet Pattern
- Crochet Twist Headband Pattern
- Crochet Face Mask Pattern Covers
- Ear Warmer Headband Crochet Patterns
- Crochet Velvet Headband Pattern
- Easy Crochet Fuzzy Scrunchie Pattern
- Free and Easy Crochet Headband Pattern for Winter
- Easy Hat Crochet Pattern: The Leigh
- Williams Crochet Beanie Pattern
- Snowy Crochet Ear Warmer Pattern for Beginners
I have been working on this head warmer for several hours and ripping it out numerous times. My stitch count keeps decreasing and 36 stitches is WAY too small for an adult. I’m using
LB thick and quick and size 9.0 hook. Is there a new corrected version of this pattern available? Very frustrating!
Hi Leigh,
This pattern is written to be a 19″ circumference, which is for a child, so there is no need for a corrected version. You can follow along with the stitch count multiples that are given under the Finished Size section to make it bigger. I suggest working up a larger stitch count such as the 39 or 42 starting chain and double check to see if that would fit properly.
Happy Crocheting,
Krista
Thank you! I will try again.
Hi Krista,
I live in San Diego and have never needed a hat or ear warmer until my sister asked me to make her some. She lives in Virginia and definitely needs them. I just loved this pattern and was soooo easy to adjust.
Thank you and I wish you well.
You are very welcome! I hope your sister enjoys her new headband!
-Krista
Love this! Mine turned out so cute. I am so pleased. Your pattern was so easy to follow, and you a great job explaining how to make it larger if needed. Huge thumbs up!
Hi Amy!
Thank you for the kind words about my headband pattern. I am so glad you liked it!
-Krista
Do you have a YouTube channel showing how to make this headband?
I do have a YouTube Channel but this pattern is not on it right now. Hopefully, in the future. 🙂
Krista
It would be amazing if you put this headband on the YouTube channel. Please.
Love this pattern! I’ve made 2 headbands and am going to attempt a hat using the same stitch. I have an average head size and start with 45 chains. I finish with a row of single crochets to tighten the outside edge and make it similar in size to row 1. The “bobbles” show best wearing it inside out. Thank you!
Hi! Fellow crochet lover and pattern writer here. Just want to drop a note and say that this pattern is truly quick and easy and looks lovely! Any updates that were made work great, and if you are familiar with reading patterns and counting out crochet stitches, this headband will be a breeze for you and will work up quickly. I am even using my stash of chunky yarn -and a 9mm hook as recommended- (so my stitch count starts with 45 ch, which I measured around my head for accuracy 😉 – its a great pattern for an unknown yarn that long ago lost its band) I will try it with 2 strands of 3 weight yarn next. Love the site and pics and am excited to whip a few of these up for the upcoming chilly NE months. I found Easy Crochet on Pinterest and will follow some more when I’m done with my headband. Thanks for a cool piece!
Hi, just finished this headband and it looks great. I had to add more chains too, used Joy Color yarn (available in my country) and size 7 hook. Thank you for the tutorial.
I am so glad you like it Hana!
Happy crocheting!
Krista
Can another yarn be used. Can’t wear wool. Thanks.
Hi. Lion Brand also makes a Thick & Quick without wool that would work perfectly.
Krista
Hi Charlene, I fixed the link. I apologize for that. 🙂
Krista
Love this pattern. I used loops and threads cozy wool in Caribbean sea. I dropped down 3 stitches from your pattern, and I end to think yours is spot on, cause mine is snug.
Can this same stitch be used to make a baby blanket or afghan? If so, would I chain 1 turn and repeat the previous row until it is the desired length? Thanks.
Hi Eva,
I haven’t tried it this stitch pattern as a blanket so I am not exactly sure how it would turn out! It is definitely something I will add to my list to try.
Krista
If you chain 36, then the first row is the sc, 2hdc’s in the second stitch from the hook, then sk next 2 chains, there is NO WAY that you can end up with 36, there is something definitely wrong, it is a really cute pattern, just going to have to start with a lot more chains to begin!
Thank you for the pattern though, it is very pretty.
Hi Kristin,
Each row has 36 stitches. It calls for 12 – sc & 2hdc’s (equals 3 stitches) clusters which equals 36 stitches.
Krista
Thank you for this lovely pattern. I added a row of single crochet to the top and bottom too.
Could you share how you achieved the multicolored look?
Hi! It as the yarn I used. Lion Brand Wool Ease Thick & Quick in Hudson Bay.
Could you share how you got the multicolor look?
Just finished this pattern and I love it. The adult size pattern did not fit me either. The next one I will add on additional rows. Love the pattern!
Hi! Thanks for the cute pattern. Does the chain one count as a stitch?
Thanks again
Kristen
Hi Kristen! No it does not. 🙂
Krista
I was trying your pattern, I’m confused with part of the direction, says (sc, 2 hdc’s) then it says sc, hdc, hdc in next st, are you meaning (sc, 2hdc’s) or sc, hdc, hdc in next 3 sts?
Hi! You will work a sc & 2 hdc’s in one stitch. Happy Crocheting!
Krista
Well, I “thought” I had the sequence down, but it was SOOOO too small for my head (as another comment on this page) and I have a small head! I could not get that headband on my head, no matter how hard I tried. VERY frustrating. My stitches do not look like your stitches either. Yours make a poofy little groupings, mine are flat. I took a picture of your version, but it wasn’t until I rotated it to upside down to see the right angle of the sample. The groupings are offset of the row below! Your instructions didn’t make that clear, that I could tell. I wish I could attach the picture of your sample, upside down. THEN you could see what you tried to describe but didn’t get it clearly across. I give up……I didn’t see any instructions stated that matched the sequence of your pattern (once turned around upside down.)
The pattern should read SL ST into the first SC not HDC. I think that was the issue. I fixed it and it shoudl work for you now. I am also putting together a step by step picture tutorial that will help too. I hope to have that posted today.
Hi Tammy,
Also I forgot to mention that the pattern includes instruction to make it bigger if the size included in the example did not work for you. 🙂
This is such a great pattern! however I have had to greatly increase the number of starting chains to get it anywhere near big enough to fit around my head and I’ve even been using a 10 mm hook instead of 9. 45 chains does the trick for me!
Is there a beanie version of this pattern!
Ian there a beanie version of this pattern? Have made the headband and love it but would also like to make a beanie.
Tried to make this but im thinking there is a step missing or I’m doing something wrong. Each round keeps decreasing.
Love the look of this head warmer so please advise.
Hi Susan,
What round does it start decreasing for you? Right away on Round 1?