Crochet Ghost Halloween C2C Blanket Pattern
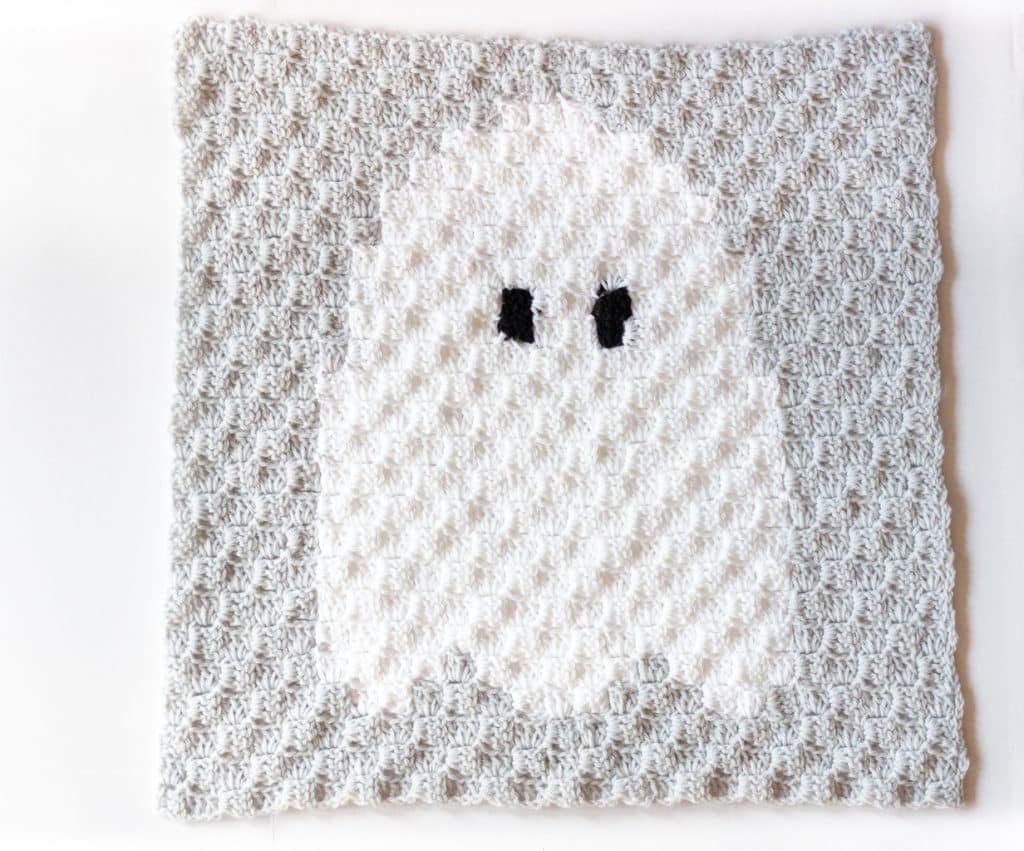
Learn how to crochet a Halloween corner to corner (C2C) blanket with this free Halloween-themed pattern!
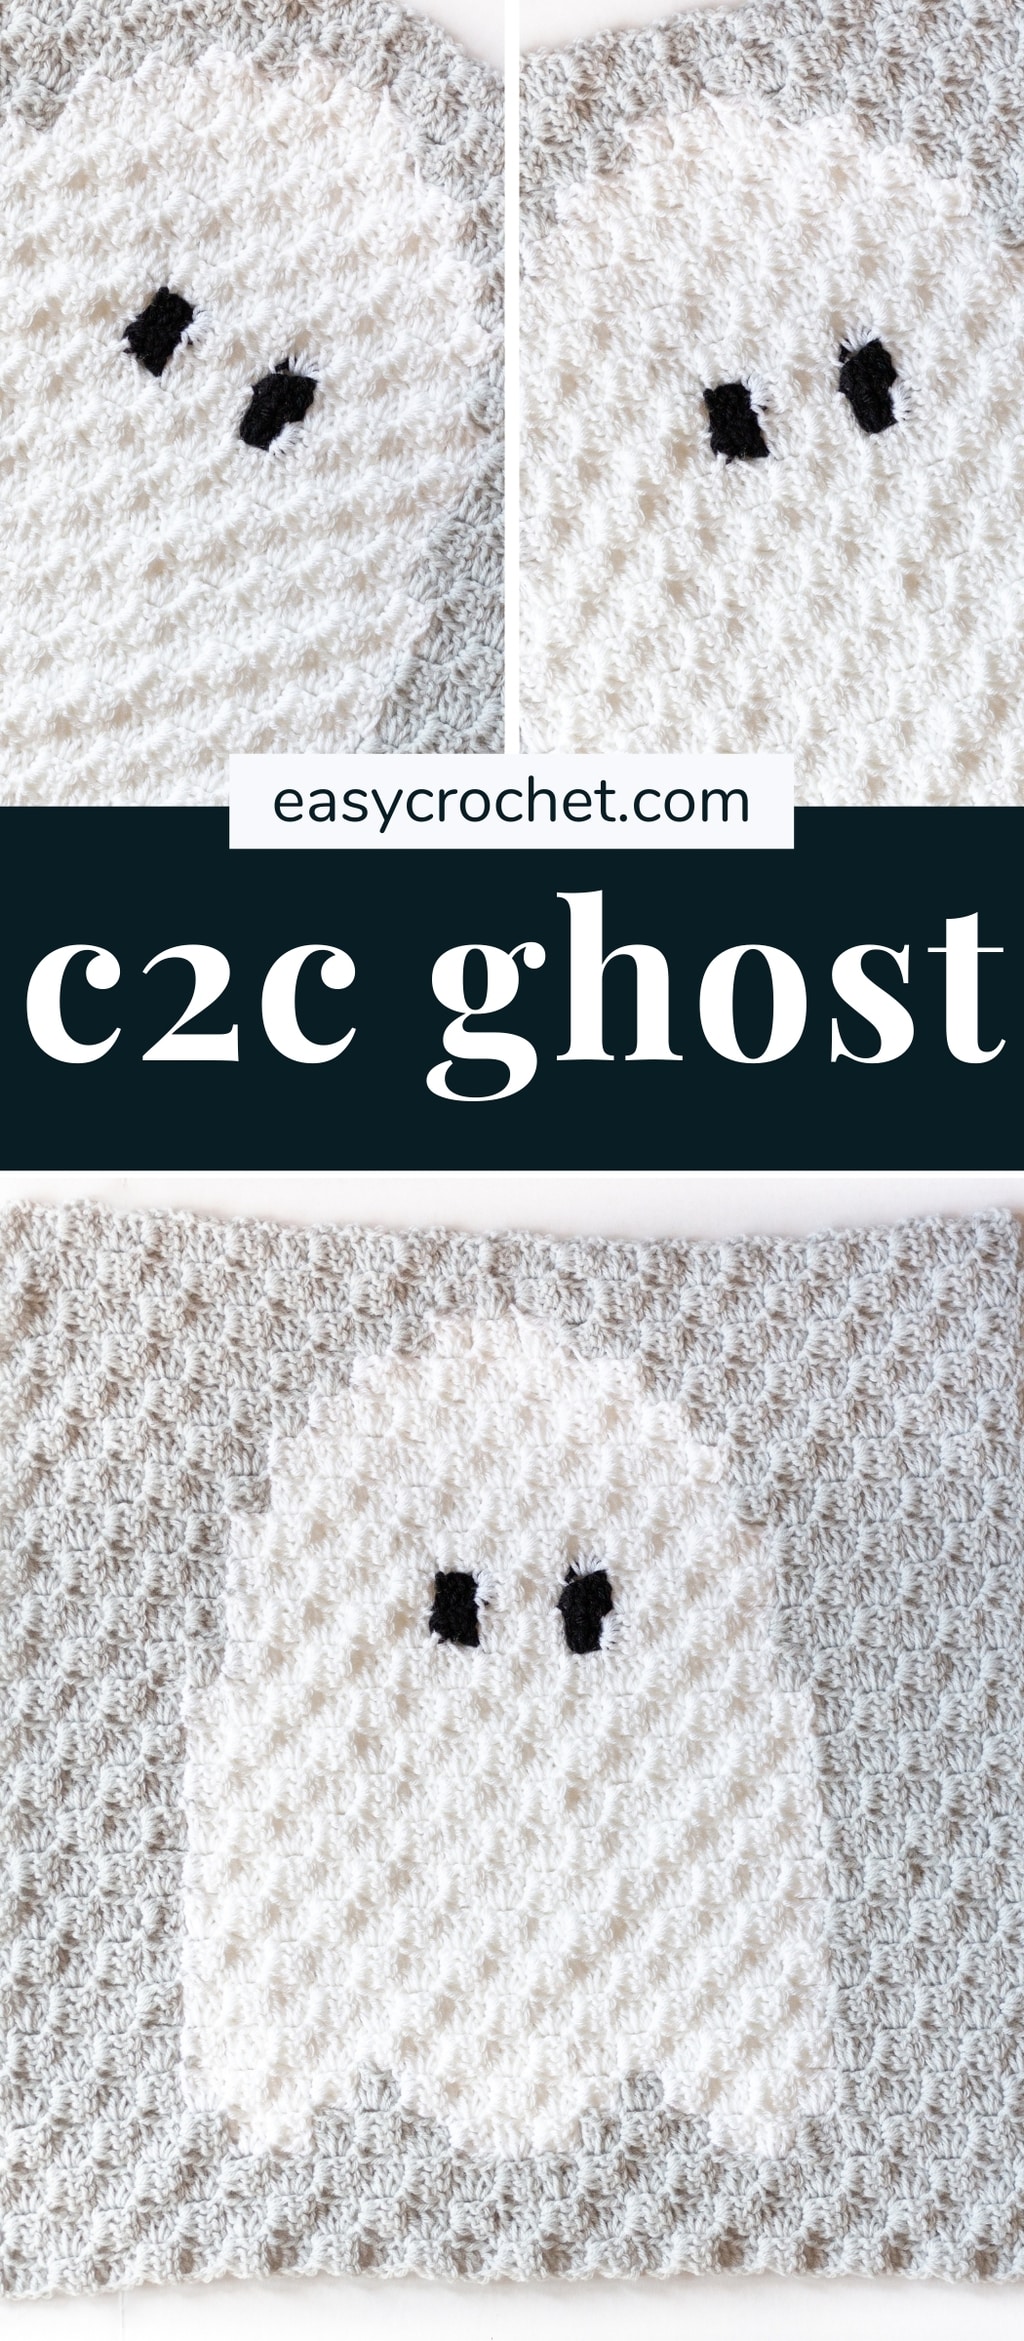
This adorable crocheted ghost square is perfect on its own, as a Halloween pillow or throw, or added to a larger afghan to make a unique Halloween blanket!
Understanding Corner to Corner Patterns
To be able to crochet this Halloween C2C blanket, you will need to know the basics of how to corner to corner crochet. C2C crochet involves working double crochets (or in other instances a half double crochet or single crochet stitches) in increasing & decreasing squares from one corner to the next.
Look over the photo tutorial below in the link to get a better understanding of exactly how this c2c blanket is worked up. If you want a deeper dive on how corner-to-corner (c2c) blankets are worked up, take a look at our how to c2c tutorial for that.
Be sure to go over the steps on how to C2C crochet in the links provided above so you will be ready to make this ghost blanket.
Free Crochet C2C Halloween Ghost Pattern
Skill Level: Intermediate
Materials
- Yarn: I used less than a skein each of Lion Brand Yarn Vanna’s Choice in Black, White and Lion Brand Yarn Pound of Love in Elephant Gray (or any Medium Weight #4: Worsted, Afghan or Aran yarn)
- Crochet Hook 6 mm (J-10)
- Scissors
- Yarn needle (tapestry needle)
- Measuring tape
Crochet Stitches Used
- dc = Double Crochet
- st = Stitch
- ch = Chain
Gauge
- 1 square = 1 inch
Finished Size
- The finished size of this blanket is 25″ x 25″ when using a medium weight yarn and a 6mm crochet hook.
- If you use a different weight of yarn and crochet hook, your c2c square size with vary.
Pattern Notes
- This free pattern is written in standard US terms.
- This ghost pattern is worked from the bottom-right to the top-left corners, alternating your starts from left to right.
- Use our C2C tutorial with step-by-step photos to help with any questions you may have about this crochet technique, as well as color changes in corner to corner crochet.
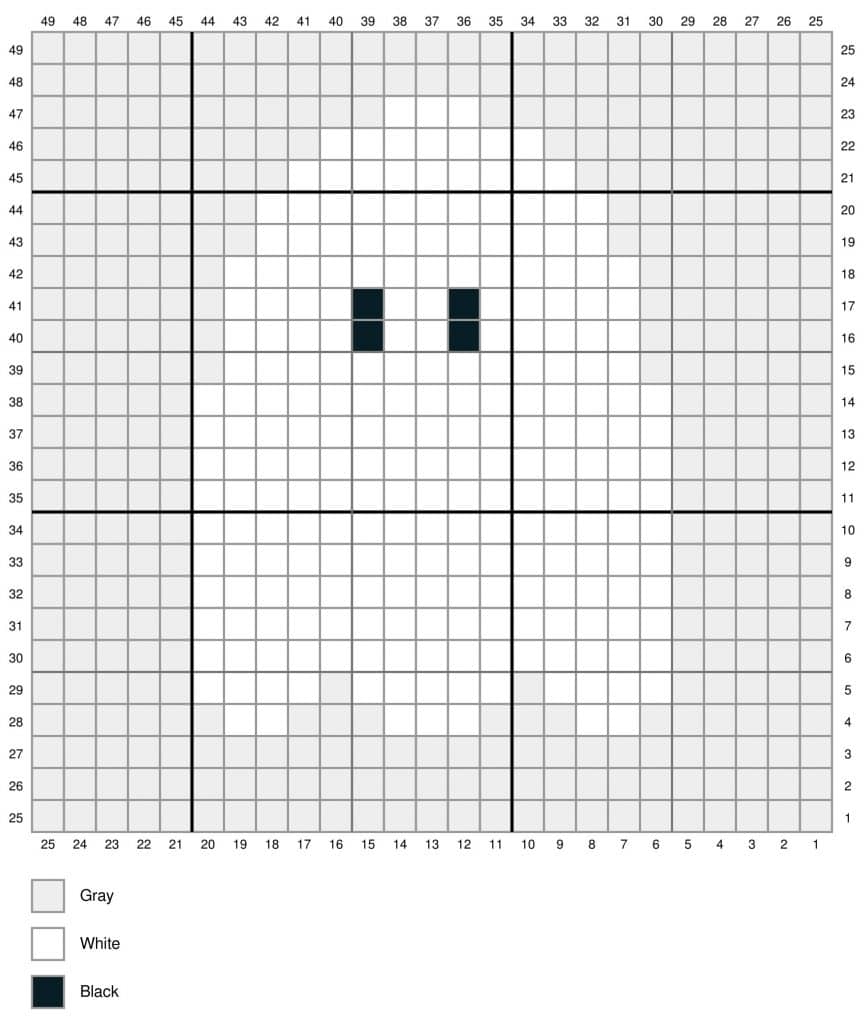
- Use a pen or highlighter to mark off each square on the printed chart as you crochet it to help you always know where you are in the pattern.
The Ghost Square Free Pattern
- ↙️ Row 1 : (Gray) x 1 (1 square)
- ↗️ Row 2: (Gray) x 2 (2 squares)
- ↗️ Row 3: (Gray) x 3 (3 squares)
- ↙️ Row 4: (Gray) x 4 (4 squares)
- ↗️ Row 5: (Gray) x 5 (5 squares)
- ↙️ Row 6: (Gray) x 6 (6 squares)
- ↗️ Row 7: (Gray) x 7 (7 squares)
- ↙️ Row 8: (Gray) x 8 (8 squares)
- ↗️ Row 9: (Gray) x 9 (9 squares)
- ↙️ Row 10: (Gray) x 5, (White) x 2, (Gray) x 3 (10 squares)
- ↗️ Row 11: (Gray) x 3, (White) x 3, (Gray) x 5 (11 squares)
- ↙️ Row 12: (Gray) x 5, (White) x 3, (Gray) x 4 (12 squares)
- ↗️ Row 13: (Gray) x 4, (White) x 4, (Gray) x 5 (13 squares)
- ↙️ Row 14: (Gray) x 5, (White) x 4, (Gray) x 5 (14 squares)
- ↗️ Row 15: (Gray) x 3, (White) x 7, (Gray) x 5 (15 squares)
- ↙️ Row 16: (Gray) x 5, (White) x 8, (Gray) x 3 (16 squares)
- ↗️ Row 17: (Gray) x 3, (White) x 9, (Gray) x 5 (17 squares)
- ↙️ Row 18: (Gray) x 5, (White) x 9, (Gray) x 4 (18 squares)
- ↗️ Row 19: (Gray) x 4, (White) x 10, (Gray) x 5 (19 squares)
- ↙️ Row 20: (Gray) x 6, (White) x 9, (Gray) x 5 (20 squares)
- ↗️ Row 21: (Gray) x 3, (White) x 12, (Gray) x 6 (21 squares)
- ↙️ Row 22: (Gray) x 6, (White) x 13, (Gray) x 3 (22 squares)
- ↗️ Row 23: (Gray) x 4, (White) x 13, (Gray) x 6 (23 squares)
- ↙️ Row 24: (Gray) x 6, (White) x 14, (Gray) x 4 (24 squares)
- ↗️ Row 25: (Gray) x 5, (White) x 13, (Gray) x 7 (25 squares)
You’ve now reached the first set of corners. From this point forward, you will now lose a square with each row crocheted.
- ↙️ Row 26: (Gray) x 6, (White) x 13, (Gray) x 5 (24 squares)
- ↗️ Row 27: (Gray) x 5, (White) x 8, (Black) x 1, (White) x 4, (Gray) x 5 (23 squares)
- ↙️ Row 28: (Gray) x 5, (White) x 3, (Black) x 1, (White) x 8, (Gray) x 5 (22 squares)
- ↗️ Row 29: (Gray) x 5, (White) x 12, (Gray) x 4 (21 squares)
- ↙️ Row 30: (Gray) x 4, (White) x 5, (Black) x 1, (White) x 5, (Gray) x 5 (20 squares)
- ↗️ Row 31: (Gray) x 5, (White) x 5, (Black) x 1, (White) x 5, (Gray) x 3 (19 squares)
- ↙️ Row 32: (Gray) x 3, (White) x 10, (Gray) x 5 (18 squares)
- ↗️ Row 33: (Gray) x 5, (White) x 9, (Gray) x 3 (17 squares)
- ↙️ Row 34: (Gray) x 2, (White) x 8, (Gray) x 6 (16 squares)
- ↗️ Row 35: (Gray) x 6, (White) x 7, (Gray) x 2 (15 squares)
- ↙️ Row 36: (Gray) x 2, (White) x 6, (Gray) x 6 (14 squares)
- ↗️ Row 37: (Gray) x 7, (White) x 3, (Gray) x 3 (13 squares)
- ↙️ Row 38: (Gray) x 12 (12 squares)
- ↗️ Row 39: (Gray) x 11 (11 squares)
- ↙️ Row 40: (Gray) x 10 (10 squares)
- ↗️ Row 41: (Gray) x 9 (9 squares)
- ↙️ Row 42: (Gray) x 8 (8 squares)
- ↗️ Row 43: (Gray) x 7 (7 squares)
- ↙️ Row 44: (Gray) x 6 (6 squares)
- ↗️ Row 45: (Gray) x 5 (5 squares)
- ↙️ Row 46: (Gray) x 4 (4 squares)
- ↗️ Row 47: (Gray) x 3 (3 squares)
- ↙️ Row 48: (Gray) x 2 (2 squares)
- ↗️ Row 49: (Gray) x 1 (1 square)
Total count of squares: (Gray) x 378, (White) x 243, (Black) x 4
Finishing: Fasten off the end of the yarn and cut it with scissors. Weave in loose ends throughout the pattern with a yarn needle.
Are you searching for the free graph pattern download? Keep on scrolling down!
The Crochet Stitches
For this crocheted ghost pattern, you will need to know the double crochet and chain stitches. These basic crochet stitches are easy to learn and make working up this free pattern go very quickly. You can learn more about each crochet stitch below, so you’ll be ready to crochet this ghost square as soon as possible.
Double Crochet Stitch (dc):
- Wrap the yarn over (YO) the hook, insert the hook into the specified st.
- YO the hook again, draw the yarn through the st, so there are 3 loops on the hook
- YO the hook again draw it through 2 loops, so there are 2 loops on the hook
- YO the hook, draw it through the final 2 loops.
Chain Stitch (ch):
A simple crochet stitch that often forms the foundation of what crochet stitches are worked into during projects.
- Make a slip knot.
- Insert the hook into the slip knot point first, bring yarn over the shaft of the hook from back to front and grab it with the throat of the hook.
- Draw hooked yarn through the slip knot and onto the hook. This movement will make one chain stitch.
- Repeat steps two and three until you have the desired number of stitches for a pattern. One loop will remain on the hook.
How to Read a Corner to Corner Chart
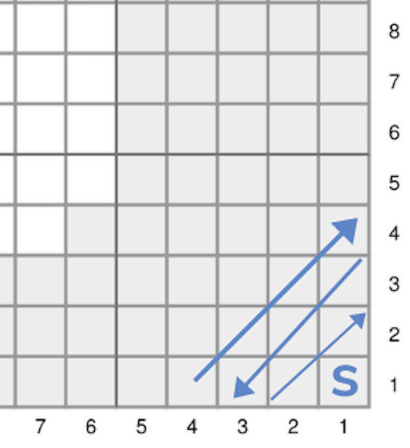
C2C charts (aka graph patterns, or pixel graph) are read by starting in the bottom-right corner then by working up to the top-left corner, increasing. Continue by alternating the start from left to right until you reach the corner at which you will start decreasing your squares.
The “S” on the chart means “Start”, meaning that is the square you should begin with. You will then work in the direction the arrows point, back and forth following the pattern until the square is finished.

Download This Free Crochet Pattern’s PDF
More Halloween and Fall Crochet Free Patterns
Explore our collection of free Halloween crochet patterns below.
- Apple Crochet Patterns Perfect for Fall
- Apple Crochet Coaster Pattern for Fall
- 7 Free Patterns for Crochet Fall Decor
- 8 Spooky Crochet Halloween Projects to Haunt Your Home
- 5 Crochet Patterns For Thanksgiving (All Free)
- Top 5 Crochet Fall Coaster Patterns
- 7 Cozy Fall Crochet Scarf Patterns You’ll Love
- Thanksgiving Table Runner Crochet Patterns
- Free Crochet Sunflower Pattern
- Last-Minute Halloween Costumes to Crochet: Easy Ideas
- 8 Spooky Crochet Halloween Projects to Haunt Your Home
- Easy Crochet Ghost Patterns for Halloween
- Crochet Ghost Halloween C2C Blanket Pattern
- Quick Easy Crochet Pumpkin Pattern (mini size!)
- 12 Best Free Crochet Pumpkin Patterns
- Free Crochet Pumpkin Pattern

Hi!
1st. I just want to say. I LOVE LOVE LOVE this pattern.
I have made my “mock up” and gave it to my grandkitten- who is also in love with it- and am now working on my more “expensive yarn” blanket.
My question is this- on row 37 it says “WS” and for the life of me, I cannot figure out what that means. I am probably missing something super obvious. But I am very new to crochet and am curious as to what it means.
Thanks in advance for any information!
Hi! It means wrong side (ws) or right side (rs) of a pattern. I originally had that in the pattern and removed it and forgot to take that one out. Thanks for finding it!
Krista
Your row 23 is written wrong. Figured it out when i made the corners.
Thanks! Fixed it! I appreciate you finding it. 🙂
-Krista
Hi – About to finish this project! One suggested edit – – – Row 23 should be (Gray) x 4, (White) x 13, (Gray) x 6 (23 squares)
As written: Row 23: (Gray) x 4, (White) x 11, (Gray) x 1, (White) x 1, (Gray) x 6 (23 squares). That (Gray) x 1 in the middle is out of place. I followed it at first, but it’s not aligned to the picture-pattern. I ripped it out and went with (White) x 13 – – – and it’s correct.
Thanks, Meagan,
I just fixed that typo! Thanks for letting me know, and happy crocheting. 🙂
-Krista